New Sub – The Crown is Back

In my previous installment I compared the results of equalization with the SVS AS-EQ1 vs. my Onkyo TX-NR545 receiver.  The SVS AS-EQ1 notched the resonance peak at 40 Hz.  However, it did not do anything to extend the response below 40 Hz.  Bass equalization algorithms like Audessey have to work with a lot of different subwoofers with varying capabilities.  So it isn’t a surprise to me that the algorithm does not attempt to extend the bass – it would be easy to damage lesser subwoofers.

How to fix that?  I know that the 18″ driver can handle a lot more – equalization is part of my design approach.  The Crown XTi-1002 showed up today – back from repair.  One of the nice features of this Crown is it includes a built-in digital processor complete with parametric equalization, crossovers, shelving circuits, and a limiter.

Step 1: Turn off all equalization (SVS AS-EQ1, Onkyo TX-NR545).

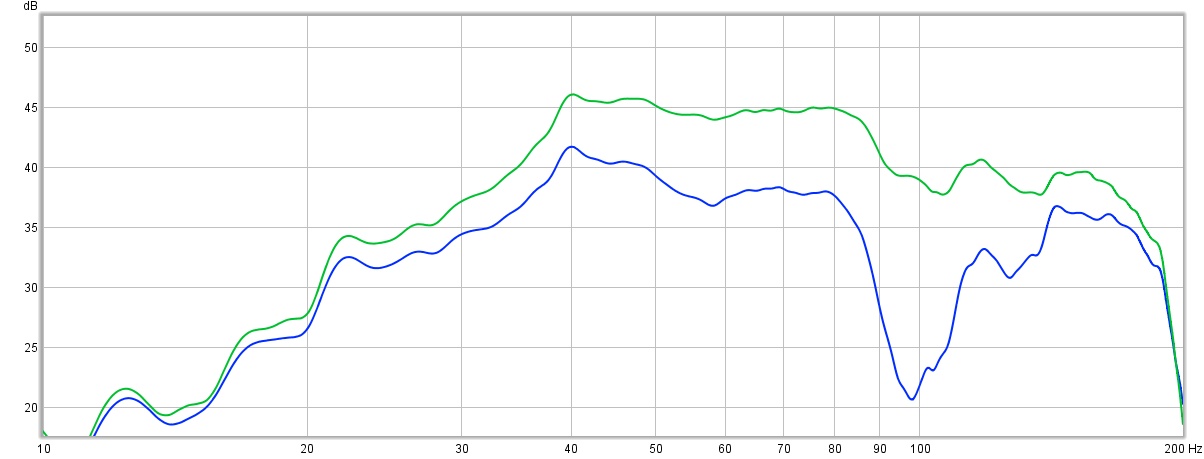
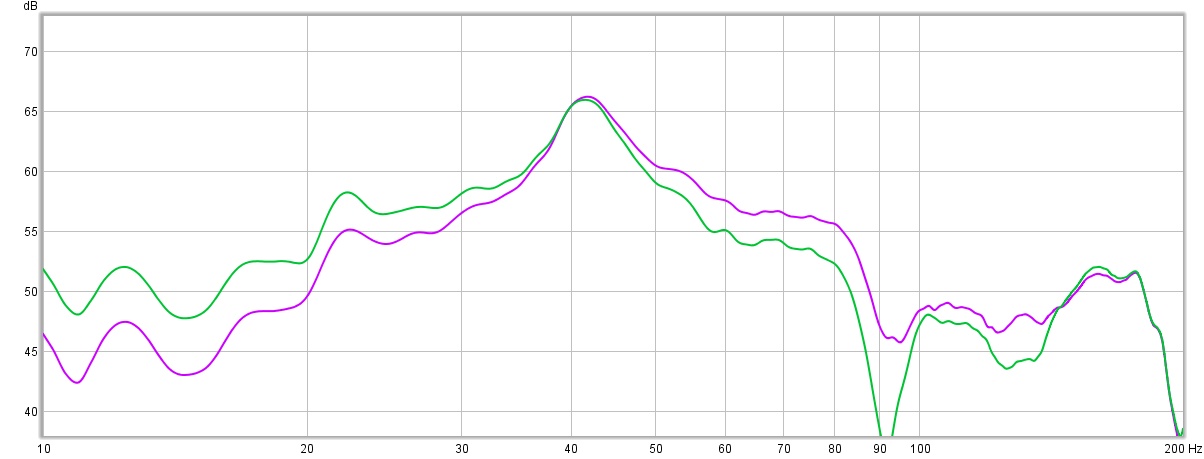
Step 2: Experiment with shelving circuits.  The goal is to extend the bass from 67 Hz to around 35 Hz.  I used two shelving circuits centered at 45 Hz.  The adds +6 dB to the low frequencies, the second -6 dB to the high frequencies.

2x shelving

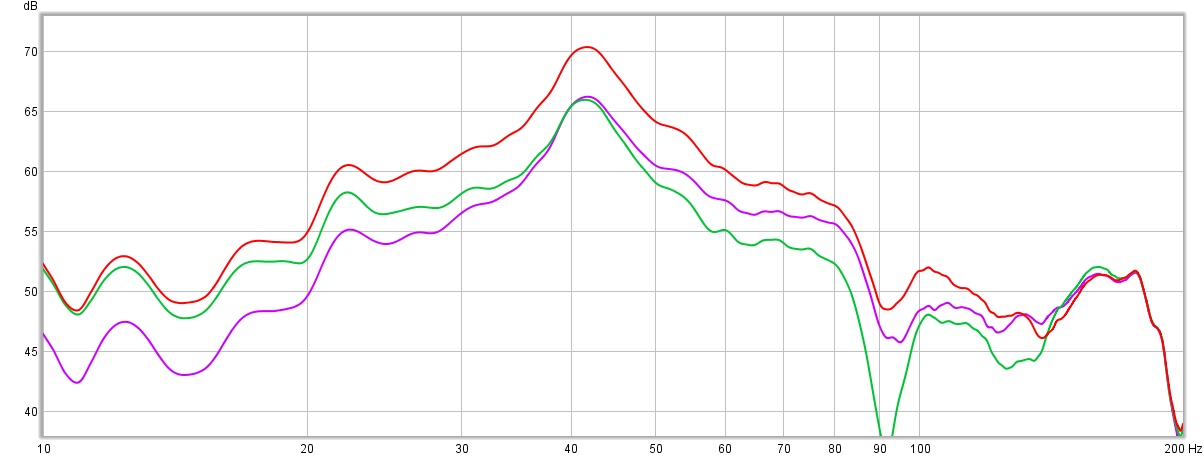
Step 3: Looking at the result suggests that too much attenuation is being applied to the second shelving circuit.  Eliminate the second shelving circuit, leaving just +6 dB on the low-frequencies.  Shown in red, the peak is very symmetric.

1x shelving

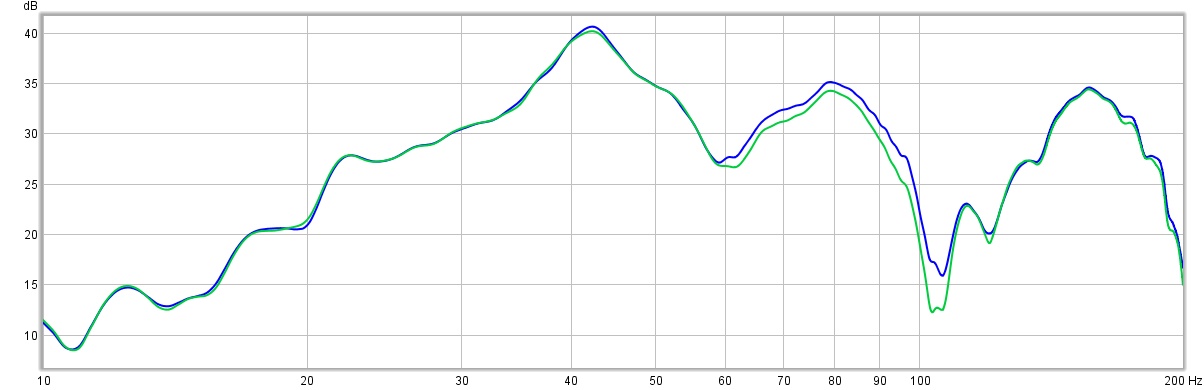
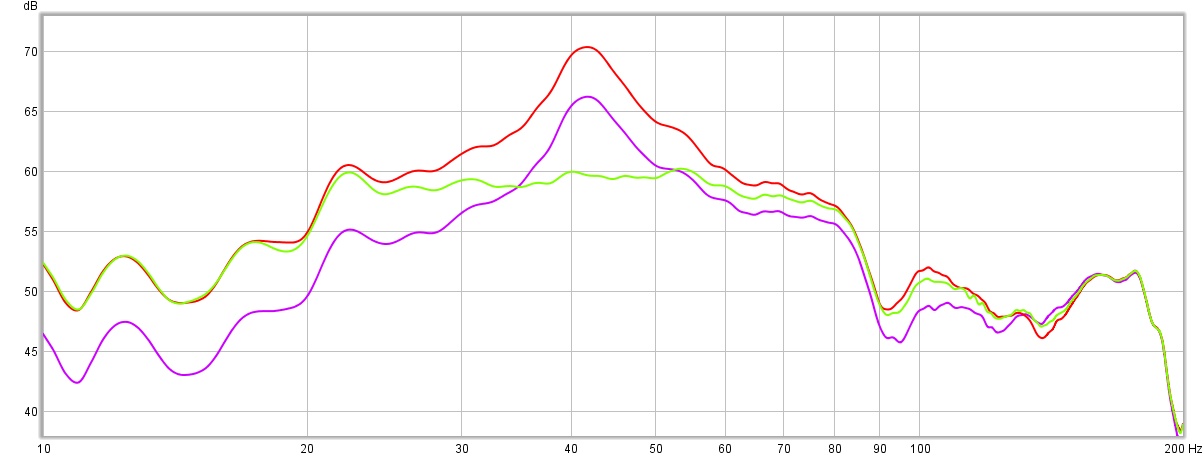
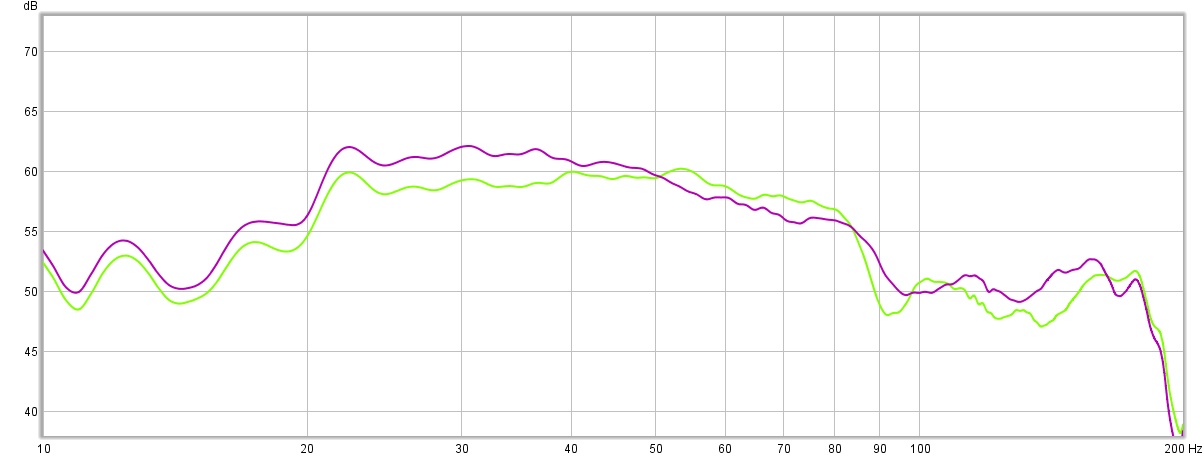
Step 4: Notch out the room’s resonance peak at 43 Hz.  The notch is set to -10.5 dB with a Q = 5.7.  Result show in light green – nice isn’t it!

1x shelf with notch

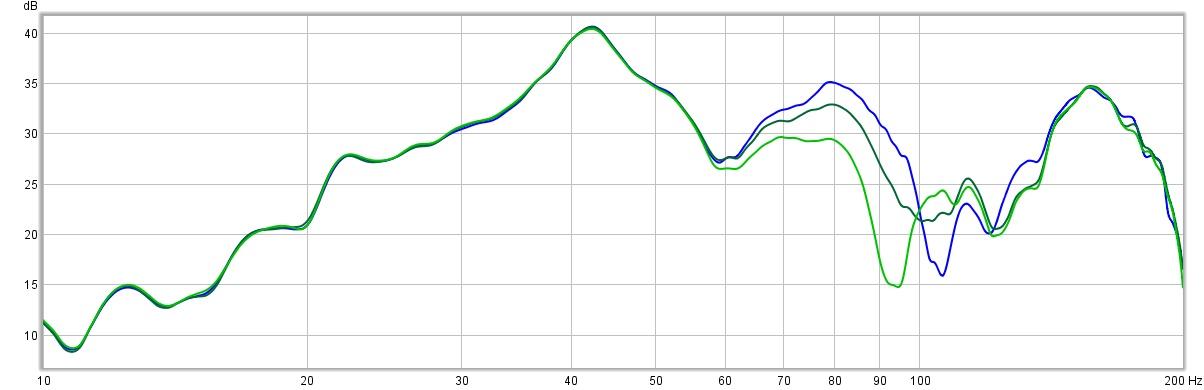
Step 5: Re-run the autoeq function of the SVS AS-EQ1 and compare to my handy-work.  Light green is my shelf + notch, blue is the new equalization result.  Pretty sweet!

SVS eq ON

Notes:

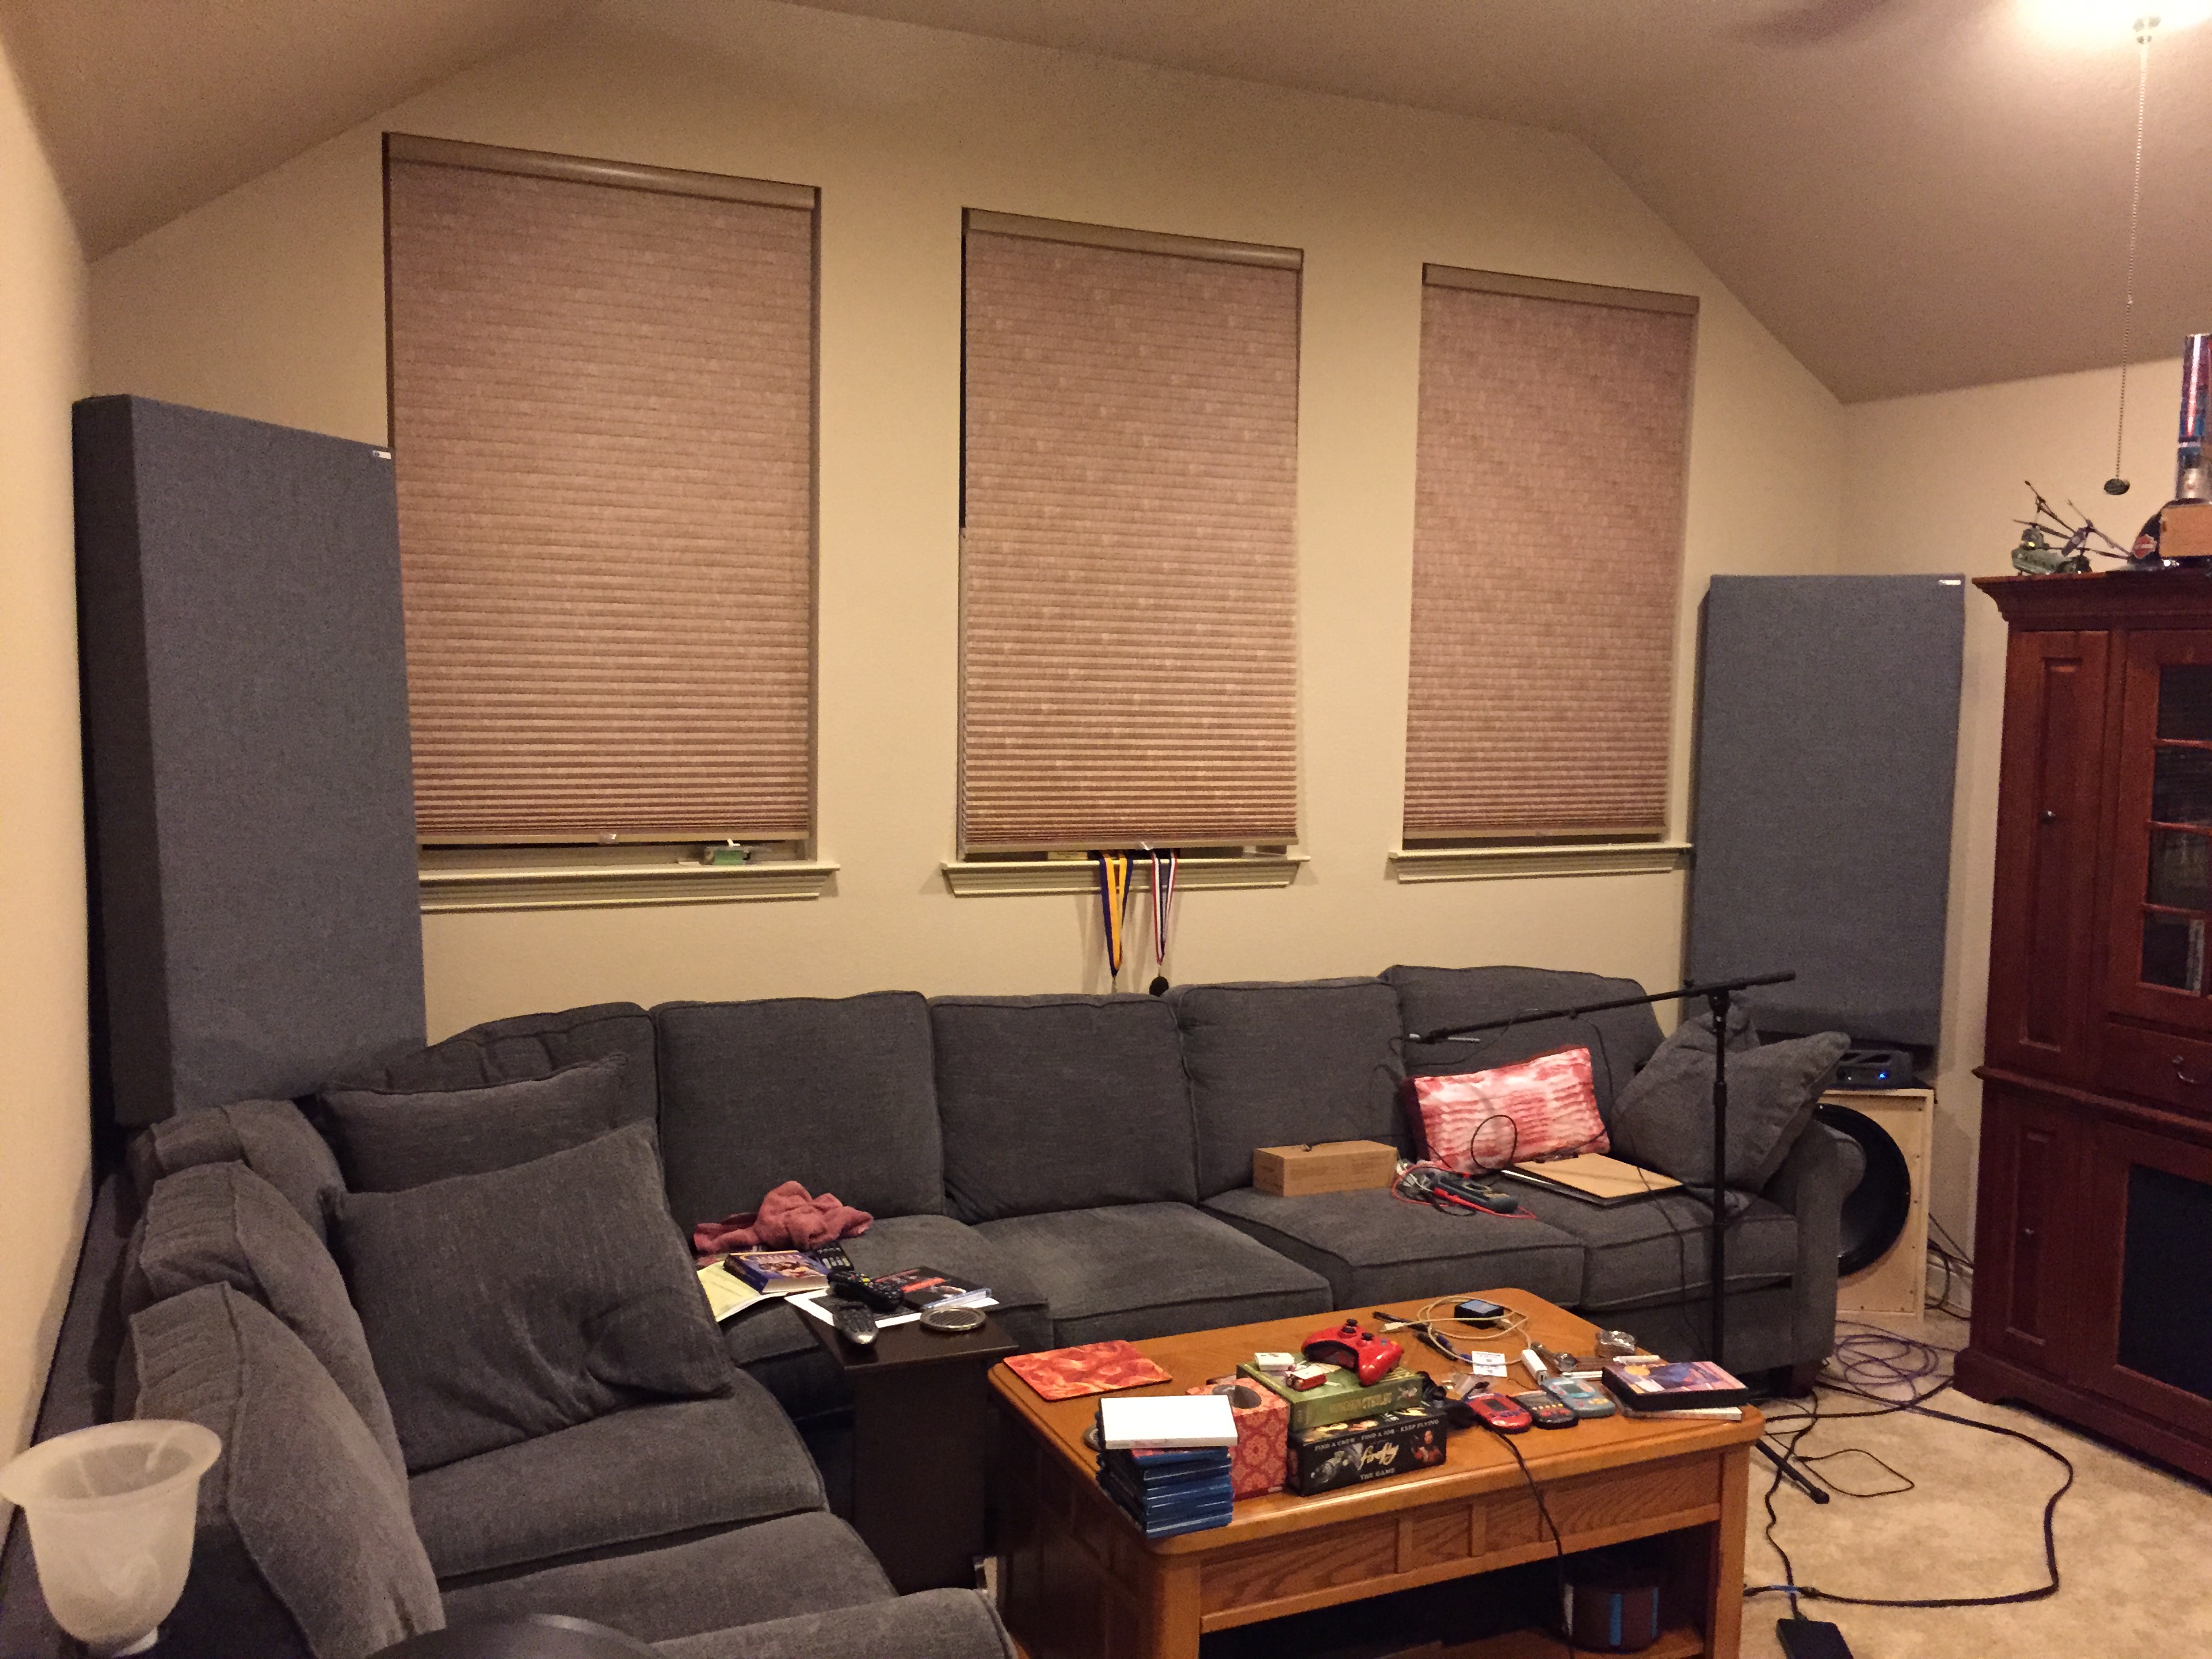
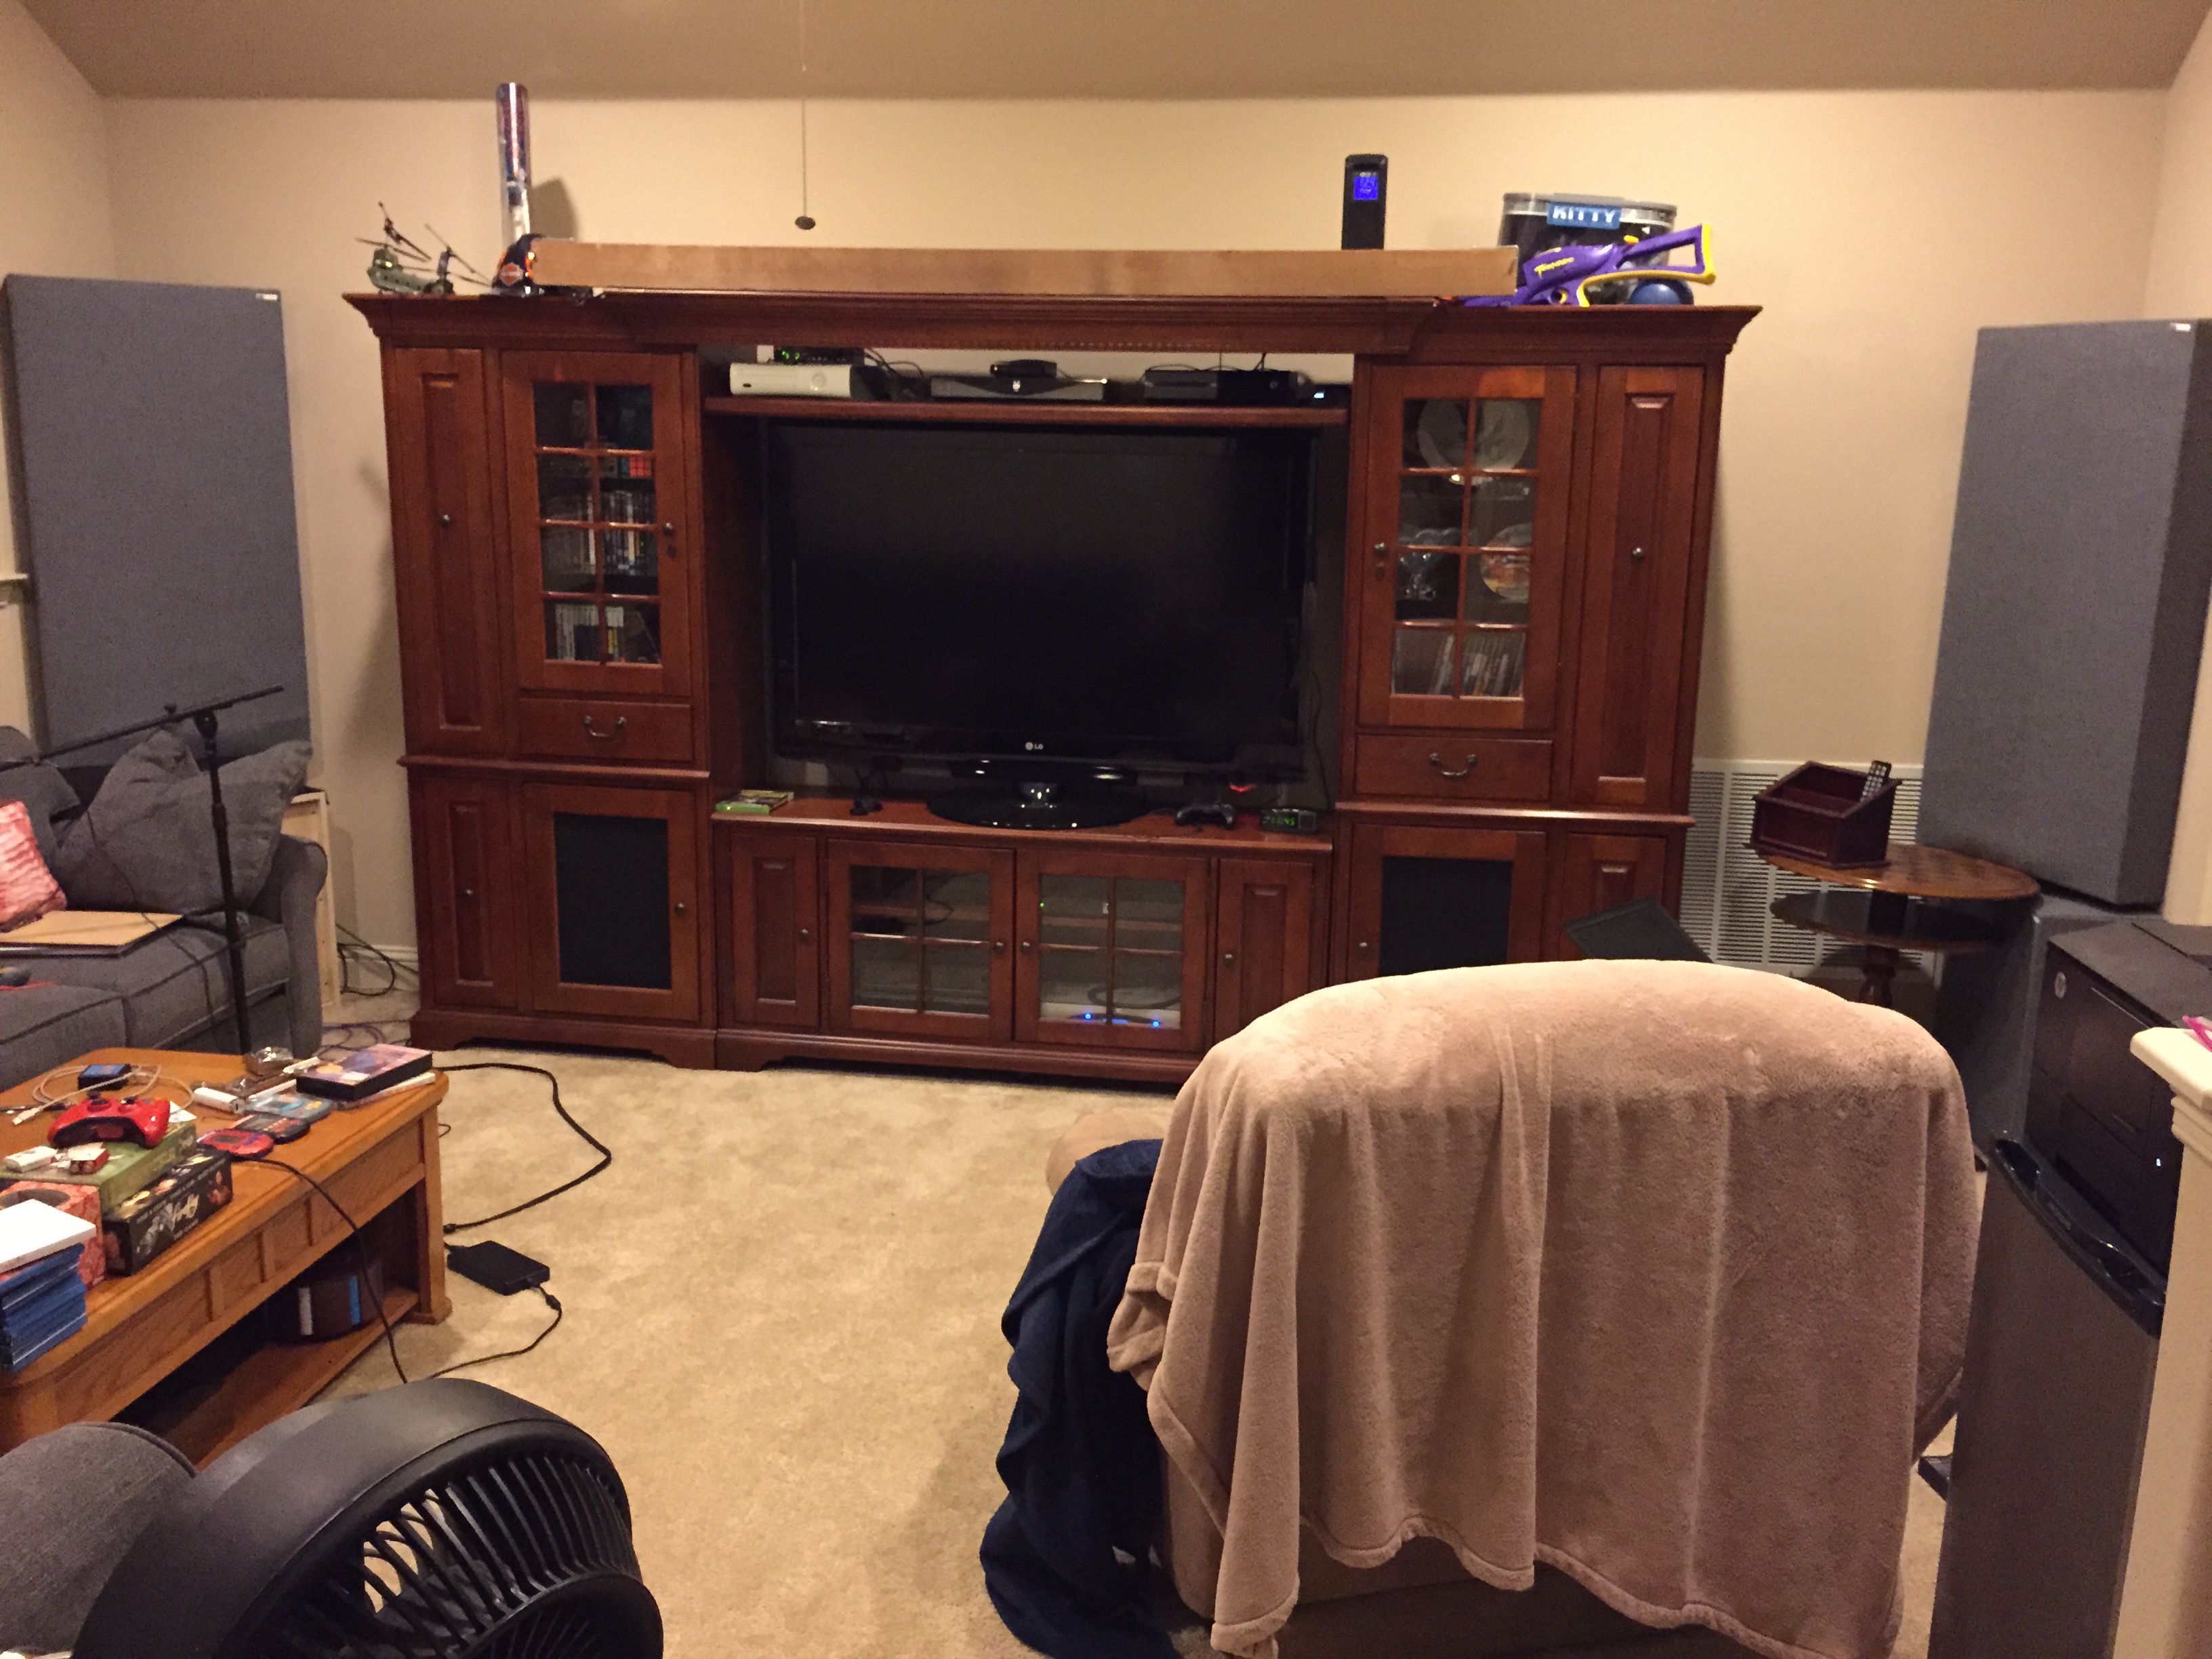
  • Subwoofer is in the left corner.
  • Onkyo receiver equalization is OFF.
  • All measurements are at my primary listening position.
  • SVS Audessey calibration performed with 5 measurement positions centered around the primary listening position.  One measurement at head level, the other 4 within 18″ of this position to the front, left, and right.
  • The room has 3 bass traps, one each of the available corners (other corner is a set of stairs).  All 3 traps are 2′ x 4′ and set diagonally in each corner.

Home Theater Left Home Theater Front

New Sub – Onkyo Calibration OFF

I had been doing some experimentation with the subwoofer’s electrical polarity and obtaining results that didn’t seem to make sense.  Reversing the polarity was giving better results.  So I decided to investigate the impact of the Onkyo TX-NR545 calibration.

Onkyo EQ On and Off

The green curve is the baseline.  Notice how nice and flat the bass is from 40 – 80 Hz.  This is the result of inserting the SVS AS-EQ1 into the subwoofer audio loop. This unit employs Audyssey auto-correction algorithms in the bass region.  I’ve always been impressed with the AS-EQ1 – some of the best subwoofer $$$ I ever spent.

The blue curve is with the Onkyo’s equivalent auto-correction applied.  What???  Yes, I double checked this several times.  The dip at 100 Hz is being created by the equalization!  I even downloaded the latest firmware, and same result.  Pretty subpar.  So I turned off the Onkyo equalization 🙁

P.S. These measurements were with bass traps in the corners of the room.

New Sub – Now with Bass Traps

Did I mention the game room I’m using for the home theater has a lot resonances?  The formula for determining resonances in your listening room is to divide the dimensions into 50% of the speed of sound.  Sound travels around 343 m/s… temperature and humidity factor into the exact number.  That translates to 1125 ft/s, and half that is 563 ft/s.  The game room’s dimensions are

  1. 17′ –> 33.0 Hz
  2. 14′ 6″ –> 38.8 Hz
  3. 10′ –> 56.2 Hz

The L-shaped sectional couch in the game room seems to have damped the 33 Hz resonance and its multiples quite a bit.  That leaves 40 Hz as the strongest resonance.

Although resonances can be dealt with electronically via equalization, they also can be eliminated by application of damping material.  The usual place to start is with “bass traps” in the corners.  A typical bass trap is 2-6″ of high density fiberglass with usual dimensions of 2′ x 4′.  I purchased a pair from GIK acoustics along with a 40 Hz tuned membrane bass absorber.

First up is the resonance absorber.  It is 2′ x 2′ x 10″.  I tried multiple positions and measured very little impact.  I finally got desperate and put the bass absorber right on top of the subwoofer.  Here is the measurement of before and after at my main listening position.

Bass Resonator Above Sub

Blue is before, light green is after.  So first thing is the absorption at 40 Hz is very small.  I was afraid that this would be the case.  Specifically, that a large number of the absorbers would be required to achieve any effect.

Next up are the bass traps.  The units I purchased are the usual 2′ x 4′ and 4″ thick.  They not entirely composed of absorbing fiber.  An air gap is on the back side which improves the quantity of absorption.  I also ordered the membrane option which adds a reflective membrane to the face of the bass trap.  This reflects frequencies above 400 Hz so that the bass trap doesn’t absorb them.  Here’s the measurement with a single bass trap located in the corner above the subwoofer (red) and the bass traps doubled up in the corner (green).

Bass Trap Above Sub

Wait, they don’t seem to absorb 40 Hz at all, how can these be called bass traps?  These results are consistent with the advertised absorption characteristics of this type of absorber.  Yeah, they don’t absorb deep bass.  The peak at 43 Hz will have to be handled with electronic filters.